Monday, November 18, 2013

The Life Preserver

I'm in a biblical leadership class and recently each student gave a five minute devotional/mini sermon on the topic of their choice. Long story short, I spoke on finding hope when all hope seems lost. I used the analogy of drowning in an ocean of hopelessness and depression, and choosing to look up at the life preserver ring and swim for it.

I decided to use a life preserver ring to describe "the tools" we can use to find hope again through Jesus which allows us to swim and not sink. We can look up from underneath the water and choose to be rescued and find the hope Jesus has for us.


When I found this life preserver, I was like a kid in a candy store! It spoke to me just like items for sale in those Pier 1 commercials speak to their prospective buyers. I wonder where this life preserver has traveled and if it's rescued anyone. I think about a cloudy, windy, rainy day on the ocean, and the vessel that charge it's waters with this life preserver on it as a symbol of safety.

This life preserver has become special to me, much more than I ever thought. It's a daily reminder of how much I need Jesus to rescue me and give me hope. I want to frame it. I've seen them used in interior design and it just makes my eyes bug out of my head because I LOVE IT!!!!

Photo via Coastal Living

Let me know if you are interested in nautical decor. I may be getting my hands on some soon. I would love to sell all things nautical - glass bouys, life preservers, anchors, netting, lighting, etc!

I hope you'll be looking forward to my upcoming blogs:

A cupcake recipe! (Finally)
Repainting a mirror that I'll be selling.
 
In the meantime, please be sure to subscribe via e-mail to my blog. 
Follow me on Twitter: @shopgirldaisy


Tuesday, November 12, 2013

Laundry Organization

Ugh! Laundry!

I don't know about you but laundry is just a pain in my rear! It collects way too quickly. It overflows the laundry basket no matter how large the basket. It ends up everywhere else besides IN the laundry basket.

Friday, November 8, 2013

Our IVF Journey

I guess it's time to talk about IVF. After all, it is a part of my life right now.

For those of you who don't know what IVF is, and I've encountered many who don't know, in vitro fertilization (IVF) is a procedure in which eggs from a woman's ovary are removed. They are fertilized with sperm in a laboratory procedure, and then the fertilized egg (embryo) is returned to the woman's uterus.

In 2008, my husband & I began trying to become pregnant. After one year, finally, I was pregnant! Unfortunately, I had a miscarriage at eight weeks. Six months later, we began trying again, and I thought for sure we'd get pregnant right away, especially since I knew a few more things about my body. Four months led to eight months, and eight months led to one year. That's when we were told that we needed to visit an infertility doctor.

I remember sitting in my OBGYN doctor's office hearing those words "infertility doctor". I wasn't physically emotional but I was in an internal state of shock. On the outside, I looked just fine, but I was lost. Lost in thoughts like, 'where do we go', 'what do we do', 'how can we possibly afford to see infertility doctors', 'what's happening', 'am I going to have to be on drugs', 'when will I have children', so many things were going through my head.

We went through a series of tests with my infertility doctor and it turns out, my health was great! Perfectly capable of carrying a child but it was my husband who had infertility issues. When we figured this out, we were given a 1% chance to conceive. I remember sitting in the waiting area in December of 2011 to get those results. We saw one or two women walking out in tears and I was in shock that I was still in an infertility doctor's office. When our doctor sat us down in his office and told us the news, we both sat quietly while he told us why. He gave us some options and when we got into the car, I had a moment of tears. How was this happening to us? Would we ever have children? Even animals are successful in having babies! Why is it that God calls us to procreate and yet we can't?! But still there were not many tears. I'm not sure if I was so heart broken that I couldn't produce them or if I felt so stuck in a state of complete hopelessness that the shock took over. I'm not sure. It was Christmas and we were in a horrible emotional state. We hid it well but Christmas wasn't fun and when you are both down you can't pick each other up. It was awful!

My husband underwent outpatient surgery in 2012 to correct an issue after many months of just letting ourselves be. We needed the time to decompress. Six months post surgery, the results were good. One year post surgery (May 2013), the results were exactly where they were preop. Dang it!

Our infertility doctor suggested from the beginning that we should consider IVF immediately but if we thought it was okay to take the extra time and explore what we were facing with my husband's infertility issue, then we could do that to. As you can see we ultimately decided not to drop thousands of dollars on a laboratory procedure and decided it would be wise for us to explore. Unfortunately it worked against us and one year postop, our infertility doctor AND urologist unanimously agreed that IVF is what needs to be done.

That's when we decided to create a Go Fund Me Crowd Fundraiser webpage to raise the funds for our IVF procedure. There's also a link on the left side of my blog. We have a video there where you can watch us tell our story.

It's been a long, emotional journey, and it's very hard to express those emotions to those who have not walked in similar shoes. It's even difficult for my own family to understand because they have children and have experienced parenthood already. I am AMAZED by so many women who have walked this same road and have experienced the same feelings I do. I've realized that I'm not crazy, that my feelings are normal, and the only way to handle them is to walk straight through it.

I've had people ask me how I would feel if I went through life and never had children. I can't answer that because my faith and hope in God is SO BIG that right now I can't mentally go there. I want children! Faith is complete trust and confidence in someone. Hope is a feeling of expectation and desire for a certain thing to happen. Thinking about never having children is allowing doubt to enter my mind and doubt is a feeling of uncertainty. It's a direct contradiction of what faith and hope is. I CHOOSE to have hope and faith that one day God will bring us a miracle whether it be naturally or through IVF.

2008 seems so long ago and many tears have been shed since then. We definitely have had our ups and downs but overall 2013 has been a good year. We've overcome ALOT and we've grown SSOOOO MUCH too. We ask that when and if you pray for us, that you are specific to pray that God would bring us a child naturally or through IVF. That's our faith at work. We are believing God for a miracle!

Monday, November 4, 2013

DIY: Fall Window & Autumn Banner

Today I'll tell you about my DIY Fall window and my sister's Autumn banner.

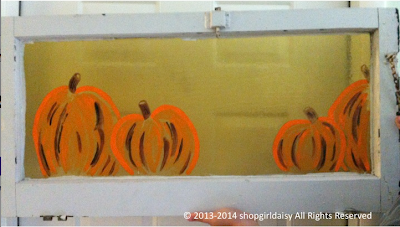
I love old vintage windowpanes. Who knows why! They are so cool and pretty. When the paint is peeling, I love them that much more! Last Thanksgiving when I hung my screen painted pumpkins window for fall, I decided that I wanted to try that same idea on glass.

And voilà....here is my beautiful DIY Fall window!

Here's how I did it...

1. Get an old window. You can find them on the curb, a rehab store, or a salvage yard. My parents visited me recently from the Orlando area and they said they saw a few on the side of the road and they questioned stopping to pick them up for me. Ummm...duh mom & dad!!!! Next time, please stop and GET THEM!!!! I say that with love. :)

2. Pick up some acrylic paint and paintbrushes. I purchased the paint, 3 for $1, at Michaels. I didn't realize until I got home that I ended up with a mix of outdoor acrylic paint, satin acrylic paint, and just plain acrylic paint. I didn't let that bother me. I just used them. I had the paintbrushes on hand so $0.

3. Draw how you want your pumpkins to be shown. I started by drawing out my pumpkins on graph paper so I could get an idea of what I wanted my window to look like. It also keeps you from making mistakes when it's time to paint.

4. Paint your pumpkins. I did not use a stencil. I hand drew my pumpkins and I'm by no means an artist! I started by painting the outlines of each pumpkin. Then, started layering in colors to create the streak-like look.

5. Find a font to create a stencil for the Fall letters. Blow them up to the size you want and print.

Unfortunately, I did not save the file so I cannot tell you what font I used or the size but here is my print out. The swirly line is my hand drawn stencil I used on each side of the letters. Take these stencils and tape them to the back of the window and use a fine tip paint brush to trace the letters and the swirly line. Let dry and begin painting in the lines. I had to paint 3-4 times to get the coverage I wanted.

And now to Mandy's Autumn Banner...Mandy's my sis. She's pretty cool! She and a friend got together to create these adorable banners. She surprised me by sending me one in the mail and while I only have two photos of my banner below, I'll still tell you how she made them. Super fun! Super cute!

1. Purchase burlap by the yard and acrylic paint (any colors you like). If you have large letter stamps, you can use those too.

2. To create the squares, create a template for size using cardboard or paper, and cut out your squares.

3. Use a large stencil or letter stamp. Mandy used a large stencil to sponge/paint the letters onto the burlap.

4. Fold a .5 inch of burlap to crease and create a pocket for the twine/hemp ribbon. And stitch it down using your sewing machine. (I've also seen some who use Wonder Under and iron two squares together to make banner stiff and keep it from fraying. Then they fold 1/2 inch over to create the pocket crease, insert twine ribbon, then dot hot glue at the corners to hold in place.)

5. Stitch the sides and bottom by sewing to keep ends from fraying. It also adds another touch of that vintage vibe.

6. Center stencil and sponge acrylic paint onto the burlap. Let dry.

And voilà....here is Mandy's awesome Autumn Banner! Thanks Mandy! I love it!! It's another one of my favorite fall decor pieces.

I hope Mandy & I inspired you to work on some DIY projects! Have fun!

Friday, November 1, 2013

Fall Decor & Christmas Music

It’s November 1st! Hello Christmas music!

One of my must have Christmas albums this year is Kelly Clarkson’s Wrapped In Red. I can’t wait to pick it up. One of the songs, Underneath the Tree, is so stinkin’ adorable and catchy! You should check it out to get yourself in the holiday mood.

I’m sentimental so holidays are very important to me. There’s nothing better than hanging out with my family. When I’m unable to, it really does kick me in the gut. I mentally and emotionally have to prepare for the lack of family connection. Hopefully, I’ll have the time this year!

If you haven’t already decorated your house for fall or Thanksgiving, the time is NOW! My fall décor was up in September. I’m not sure what to call my style for fall but most of my pieces are my faves! I purchased a lot of my decorations in Tulsa where I lived for six years. There was this fabulous old fashioned country craft fair, The Brush Creek Bazaar, that was held on a piece of property with an old grey barn. Vendors were inside and outside the barn; there were pumpkins and mums everywhere. It was the perfect place to stroll, buy fall décor, and eat kettle corn and peanut brittle.

This year I decided to paint an old windowpane for Thanksgiving to get my DIY juices flowing and my sister made me an awesome autumn banner. More on these DIY projects in my next post.

Here are some of my decorations purchased at the bazaar or elsewhere.

I love these wooden blocks! I have a Christmas set too. I got them a the Brush Creek Bazaare.

Also purchased at the Brush Creek Bazaare. These pumpkins are painted on a screen but you can't tell from this photo. It inspired me to paint an old window which I'll tell you about in my next blog.

I love this turkey's legs made of twine. A foot has fallen off but I'm not getting rid of him. I've got the foot somewhere but it keeps falling off.

This is Tom the Turkey. He greets visitors and is one of the oldest pieces I have. He was purchased at a craft fair in Central Florida 10+ years ago.

Ah! My stained glass turkey! I love him! Can you guess where I got him? Cracker Barrel. No joke! My mom and one of my sisters has stained glass pumpkins that came from there too.

Whatever your style, be sure to take time and enjoy decorating for Thanksgiving. I'd love to hear all about your fall decorations.